The question
Should you set your stop by how much money you can stand to lose, or by where the chart shows you are wrong?
After this lesson you will
- Place the stop at the trade idea's invalidation level
- Understand the link between the stop, 1R and position size
- Tell F-SL (fixed) apart from T-SL (dynamic) in AURORA
What is a stop loss?
A stop loss is a price decided before entry at which the trade is closed because the idea is wrong. It has two roles:
- Invalidation: it marks where your hypothesis stops being true.
- Risk cap: the distance from entry to stop is 1R; position size is set so that 1R equals exactly the money you accept to lose.
Why should the stop sit at the invalidation level?
- The market does not know your pain threshold. A stop set by money (“cut at a 50 USD loss”) usually lands somewhere random, easily tagged by a normal pullback.
- The invalidation level means something. In an uptrend, below the latest low is where the up-structure breaks; reaching it means you really are wrong.
- Money at risk is adjusted by size. A far stop means smaller size, a near stop larger size; the money lost when wrong stays the same.
Common mistakes
- No stop, or a “mental stop”. When the market moves fast, emotional decisions always come late.
- Widening the stop when price goes against you. The loss exceeds 1R and discipline breaks.
- Placing it exactly at an obvious high or low. That is where resting orders cluster; add a buffer, such as a small fraction of ATR.
- A stop too tight for a “nice R”. A tiny 1R lets costs and noise dominate, and the trade gets stopped out for no real reason.
Chart example
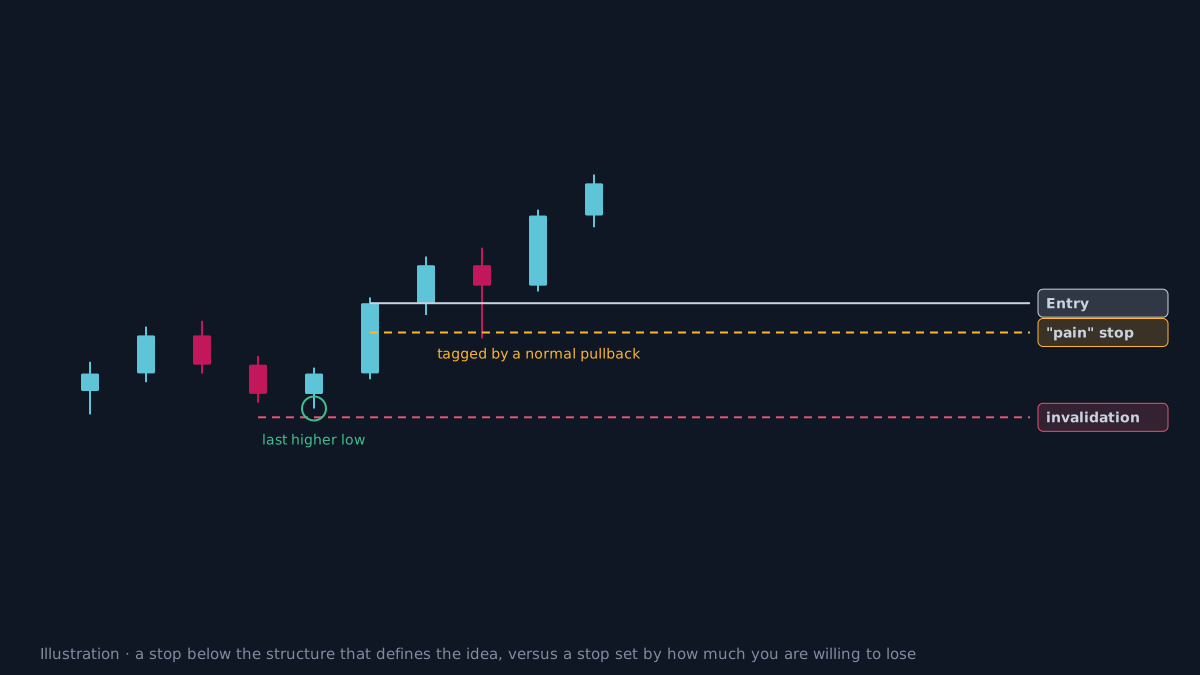 Illustration. The money-based stop is tagged by a normal pullback; the stop below the latest higher low is not.
How does AURORA use stops?
- F-SL: the trade’s fixed stop, set at the entry candle.
- For BREAK and SUNNY: the Trailing line value at the signal candle.
- For SMC (AURORA Pro): the setup’s structural stop.
- T-SL: the dynamic stop following the current Trailing line, changing every bar, as a reference for manual management. The
🛡 T-SLlabel on the right edge also shows the % risk of entering at the current price. - 1R = |Entry − F-SL|. TP1, TP2 and all statistics use this 1R.
- Setups keep the F-SL after TP1 by default; Smart signals and some Pro Trading Styles move to breakeven.
Limits of a stop loss
- Gaps and slippage. Price can jump the stop; the real loss exceeds 1R.
- A stop does not fix the wrong size. A correct stop with an oversized position can still do serious damage.
- There is no “perfect” stop. Every stop is sometimes hit just before price turns back; that is the cost of capping risk.
Practical checklist
- Ask: where is my idea clearly wrong? Put the stop there.
- Add a small buffer (a fraction of ATR) beyond that level.
- Size the trade from the stop distance, not the other way round.
- Place the stop on the exchange as soon as you enter, not in your head.
- Never widen the stop when price moves against you.
Video Explainer
The video for this article is in production. The full written lesson is already complete.
Video chapters
- Pain threshold or where you are wrong
- The invalidation level
- Stop, 1R and size
- F-SL and T-SL in AURORA
- Common mistakes
Show transcript
Many traders set their stop by how much they can stand to lose: lose 50 dollars and cut. But the market does not know how much you can lose.
The stop should sit where, if price gets there, the trade idea is wrong, for example below the latest low in an uptrend. The amount of money at risk is then controlled by position size.
The distance from entry to stop is 1R. Only once you know 1R can you work out how big to trade.
In AURORA, F-SL is the trade's fixed stop, while T-SL is the dynamic stop following the Trailing line, for reference.
Product documentation
Educational and decision-support content, not investment advice. Chart examples are illustrative or historical and do not guarantee future results. Trading carries a risk of capital loss.