If price moves your way for a while and then turns, do you already know what you will do?
After this lesson you will
- List the five parts of a trade plan
- Calculate R results for a plan closing 50% at TP1 and 50% at TP2
- Understand fixed stops versus moving the stop to breakeven
What is a trade plan?
A trade plan is five decisions made before entry:
- Entry: where you enter, with a market order or a limit order.
- Stop loss: the price at which the trade idea is considered wrong. The distance from entry to stop is 1R.
- Size: worked back from the money you accept to lose for 1R (position sizing).
- Take profit: one or more take-profit levels, and what share of the position closes at each.
- Other exit rules: what makes you close before the stop or target, such as a maximum holding time or a trend reversal.
With all five in place, there is no “what now?” question while the trade is running.
Why decide before entering?
- Once in a trade, you are no longer objective. When losing you want to wait; when winning you fear giving it back. Deciding first avoids both reflexes.
- Statistics become meaningful. If every trade exits differently, win rate and average R no longer describe your system.
- Risk is capped in advance. Size comes from the stop, so one loss cannot exceed what you accepted.
Where do traders go wrong when planning?
- A stop but no take-profit plan. Winners are held until they turn into losers, or closed too early out of fear.
- Targets set by feel. Targets should be in R so you know whether the potential reward justifies the risk.
- Widening the stop when price moves against you. The loss is now larger than the original 1R.
- Changing rules mid-stream. Breakeven today, not tomorrow: the final results reflect no rule at all.
Chart example
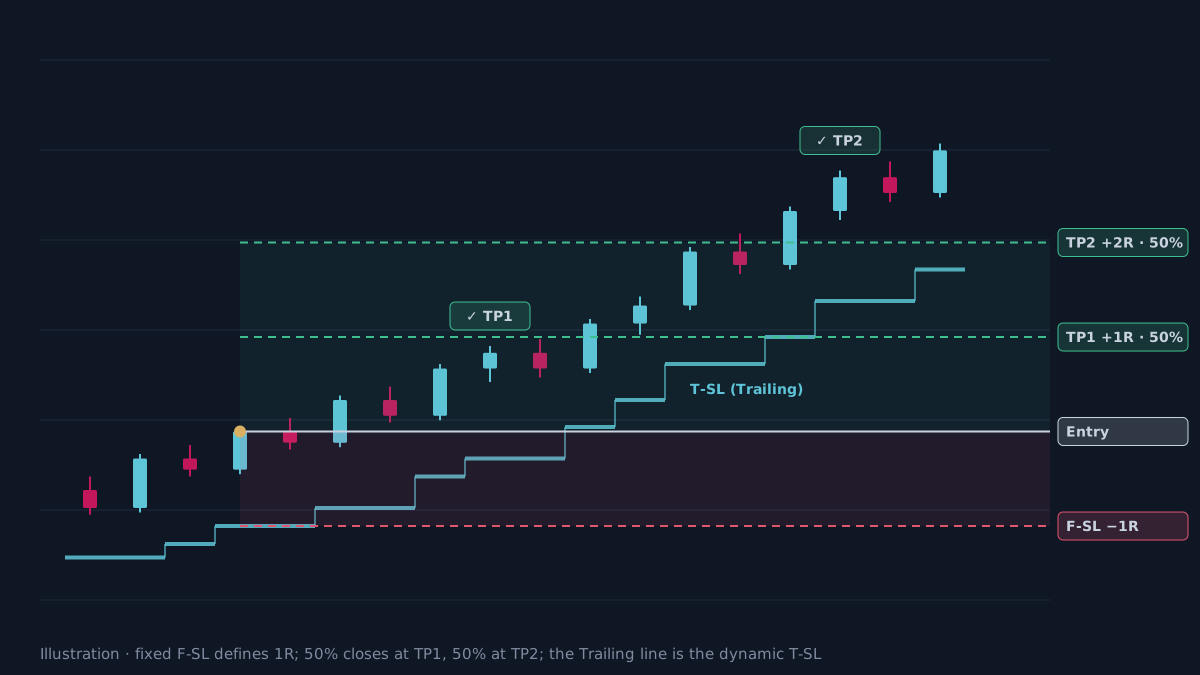 Illustration, not real market data.
A common plan: close 50% of the position at TP1 (+1R) and 50% at TP2 (+2R). The result depends on whether, after TP1, you keep the stop or move it to breakeven:
| What happens | Keep the stop | Move to breakeven after TP1 |
|---|---|---|
| TP1, then TP2 | +1.5R | +1.5R |
| TP1, then back to the stop | 0.5 × 1R − 0.5 × 1R = 0R | 0.5 × 1R + 0 = +0.5R |
| Stop before TP1 | −1R | −1R |
| TP1, then an early exit at +1.3R | 0.5 × 1R + 0.5 × 1.3R = +1.15R | +1.15R |
Breakeven protects the remaining position, but it also closes many trades on normal pullbacks before they reach TP2. Neither choice is right in every case; what matters is choosing in advance and staying consistent.
How does AURORA draw the trade plan?
Every signal that is entered in AURORA Standard and AURORA Pro comes with a plan drawn on the chart: a red risk box, a green target box, and Entry, F-SL, TP1 and TP2 labels.
- F-SL is the fixed stop set at the signal candle. For BREAK and SUNNY it defaults to the Trailing line value at the candle close. T-SL is the dynamic stop following the current Trailing line, a reference for manual management.
- Defaults: TP1 = 1R, TP2 = 2R, closing 50% / 50%.
- After TP1: BREAK and SUNNY setups keep the F-SL by default, as in the original setup. Smart signals move to breakeven by default. In AURORA Pro, the Scalping and Prop Firm Trading Styles turn on breakeven for setups too.
- Early exits, Adaptive mode (default): EXIT when the Trailing line flips, TIME when the maximum holding time runs out (200 bars by default), REV on an opposite signal, NEXT when a new same-direction Break takes over.
- Result labels are written in R, for example
✓ +1.5R · TP2or■ 0R · SL, and the dashboard adds up results for each setup.
You do not need AURORA to have a trade plan: one note line with the five parts above is enough.
When does the plan not play out as drawn?
- Gaps and slippage. Price can jump through the stop; the real loss exceeds 1R.
- Sizes that cannot be split. With one futures contract or a minimum lot size you cannot close 50%; the plan must become a single full exit.
- Statistics exclude costs. Chart results are historical and before commission and slippage. Use the Strategy Validator for figures after costs.
- Every market is different. A 1R / 2R plan that suits gold H1 may not suit crypto M5. Check it on the exact symbol and timeframe you trade.
Practical checklist
- Write down entry, stop, TP1, TP2 and size before placing the order.
- Decide in advance: after TP1, keep the stop or move it to breakeven.
- Decide in advance your early-exit reasons: time limit, trend reversal, opposite signal.
- Do not change the plan mid-trade out of emotion; if you change it, record why.
- Record every result in R so it can be compared with the plan.
Video Explainer
The video for this article is in production. The full written lesson is already complete.
Video chapters
- Price moves your way, then turns
- The five parts of a trade plan
- Partial exits: +1.5R, 0R, −1R
- The trade plan in AURORA
- When the plan does not play out as drawn
Show transcript
Product documentation
Educational and decision-support content, not investment advice. Chart examples are illustrative or historical and do not guarantee future results. Trading carries a risk of capital loss.