Why are five indicators all saying 'up' not five pieces of evidence?
After this lesson you will
- Understand why indicators built from the same price data are not independent evidence
- Know what the six Family Score families measure and their default weights
- Know how to test whether the score actually picks better trades on your data
What is Family Score?
Family Score is how AURORA rates how favourable the context is for one trade direction (buy or sell), on a 0–100 scale. Instead of adding points for each indicator, the score is split into six families, each answering a different question:
| Family | Question | Default weight |
|---|---|---|
| Trend | Do the long-term trend, the Trailing line and the higher timeframes agree? | 15 |
| Momentum | Is momentum supporting this direction? | 10 |
| Structure | Where is price relative to structure: above or below key levels, beyond recent highs / lows? | 25 |
| Volatility | Is volatility expanding or compressed? | 15 |
| Flow | Do volume and money flow confirm (RVOL, Delta, VWAP, CMF, Open Interest where available)? | 25 |
| Execution | Would entering now be late: has price run too far, or too far from the stop? | 10 |
The final score is the weighted average of the six families. A family with no data (for example Flow when no usable volume exists) is dropped from both the numerator and the denominator, not counted as 0.
Why score by family?
- No double counting. Many indicators come from the closing price and tend to agree. Five momentum indicators saying “up” are close to one piece of evidence.
- They measure different things. A strong trend where price has already run far (low Execution) is very different from a strong trend just leaving a squeeze.
- Transparency. You know which family drives a high score, rather than seeing a single number.
Common misunderstandings
- A score of 80 means an 80% win rate. No. The score is not a probability. It only ranks the context from poor to favourable.
- Higher is always better, on every symbol. On some markets very high scores appear when the trend is stretched, leading to late entries. It has to be tested with data.
- More indicators means more accuracy. More indicators in the same family only make the score more “confident”, not more correct.
- Forex is penalised for missing volume. The Flow family is simply dropped and the other families are reweighted.
Chart example
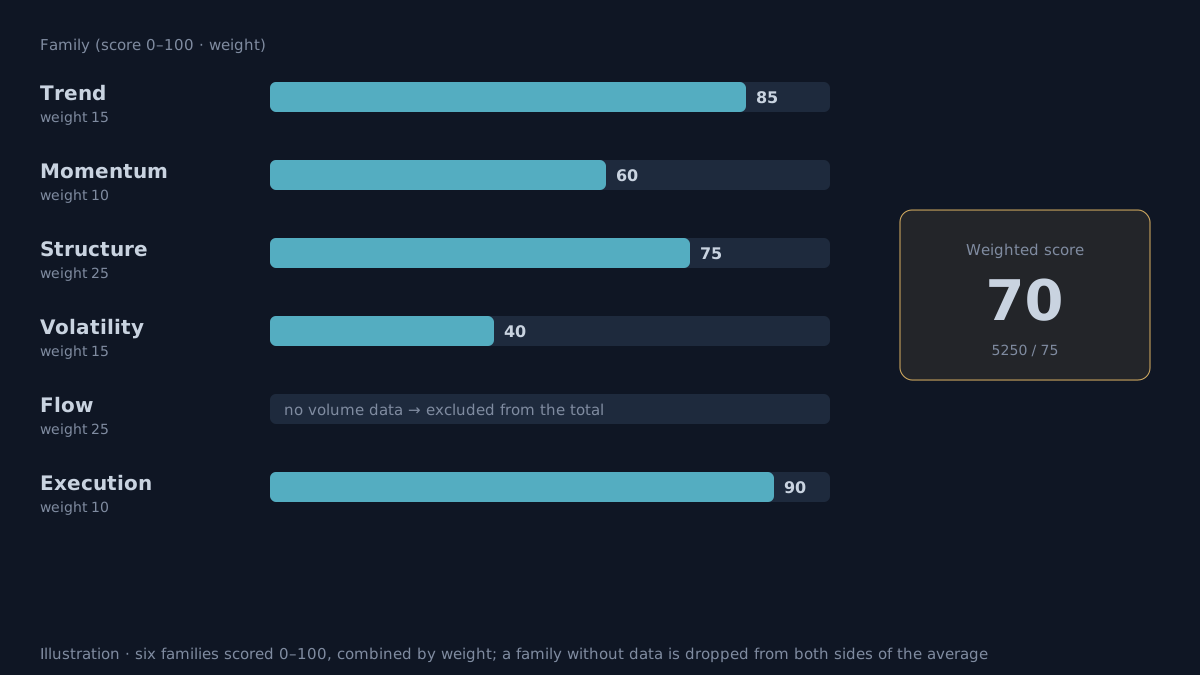 Illustration with hypothetical values.
A forex pair with no usable volume, so the Flow family is dropped:
| Family | Score | Weight | Score × weight |
|---|---|---|---|
| Trend | 85 | 15 | 1,275 |
| Momentum | 60 | 10 | 600 |
| Structure | 75 | 25 | 1,875 |
| Volatility | 40 | 15 | 600 |
| Flow | no data | (dropped) | |
| Execution | 90 | 10 | 900 |
| Total | 75 | 5,250 |
Score = 5,250 / 75 = 70. If volume were available and Flow scored 60, the score would be (5,250 + 1,500) / 100 = 67.5.
How does AURORA use Family Score?
- Default: the Score engine box defaults to Family in AURORA Standard V12.2 and AURORA Pro V15.4. The alternative is Classic, which adds points for trend and volume as in earlier versions.
- Two-sided scores: every bar has a separate LONG and SHORT score, shown on the dashboard.
- Smart signals: grade A from 80 points, grade B from 70.
- BREAK / SUNNY / SMC setups: need a minimum score, 50 by default. In AURORA Pro it follows the Entry Filter Profile: 50 / 55 / 60.
- The signal label tooltip shows each family, for example
🧩 T/M/S/V/F/E 85/60/75/40/—/90. A “—” means that family has no data. - Adjustments:
- Session points: for forex, Session mode = Score adds or subtracts points by session.
- Missing external volume penalty: when external volume is used for CFDs but no data arrives, the score loses 5 points.
- The six weights can be changed in the FAMILY SCORE settings group.
- Validation: in AURORA Pro, the dashboard splits BREAK results into Score ≥ 70 and Score < 70. This is the most direct way to see whether the score helps on the symbol you trade.
The limits of a score
- Weights are a design choice. They are reasonable in theory, not optimal for every market.
- Families still correlate. Trend and Structure tend to be high together in strong trends; “independent” is relative.
- You need enough trades. A gap between high-score and low-score groups over a few dozen trades may be chance.
- Raising the threshold cuts trade count. Fewer trades is not necessarily better. Check average R, drawdown and trade count before changing it. Historical results, before costs.
Practical checklist
- Read the score as how favourable the context is, not as a probability of winning.
- Check each family in the tooltip to see where a high score comes from.
- On forex without real volume, remember the Flow family is dropped from the score.
- Compare high-score and low-score trades before raising the score threshold.
- After changing weights, recheck statistics on the exact symbol and timeframe you trade.
Video Explainer
The video for this article is in production. The full written lesson is already complete.
Video chapters
- Five indicators, one piece of evidence
- Six families and their weights
- A worked example: 70 points
- The score in AURORA
- The limits of a number
Show transcript
Product documentation
Educational and decision-support content, not investment advice. Chart examples are illustrative or historical and do not guarantee future results. Trading carries a risk of capital loss.