The question
You missed the Break: is there a rule-based entry when price comes back?
After this lesson you will
- Identify the retest zone: the displacement's FVG, or the Order Block when there is no FVG
- Know the setup's confirmation and invalidation conditions
- Know how AURORA Pro places the stop and scores SMC RETEST
What is SMC RETEST?
A strong breakout often leaves “traces” on the chart:
- An FVG (Fair Value Gap): a price gap in a three-candle pattern, when price moved too fast.
- An Order Block: in the common definition, the last opposite candle before the displacement.
SMC RETEST waits for price to return to that zone and enters on confirmation, for example in an uptrend:
- A Break occurs in the trend direction.
- Price pulls back and touches the FVG (or Order Block).
- A bullish candle closes above the zone midpoint: that is the entry.
Why does the zone after a breakout matter?
- A better price than chasing. Entering on the pullback rather than at the top of the thrust gives a closer stop.
- A clear invalidation level. If price closes through the zone, the “zone holds” idea is wrong.
- Order-flow logic. In SMC, areas price moved through too fast are where the driving side’s orders were not fully filled, so price tends to come back to test them.
Common misunderstandings
- Touching the zone is the entry. Touching is only necessary; a confirmation candle must close beyond the midpoint.
- A zone stays valid forever. The older a zone, the less it means; repeated touches weaken it too.
- Order Block and FVG are interchangeable at will. You need a fixed priority rule; choosing the zone after seeing the outcome is self-deception.
- Counter-trend retests work the same. A retest against the main trend is a different, much riskier strategy.
Chart example
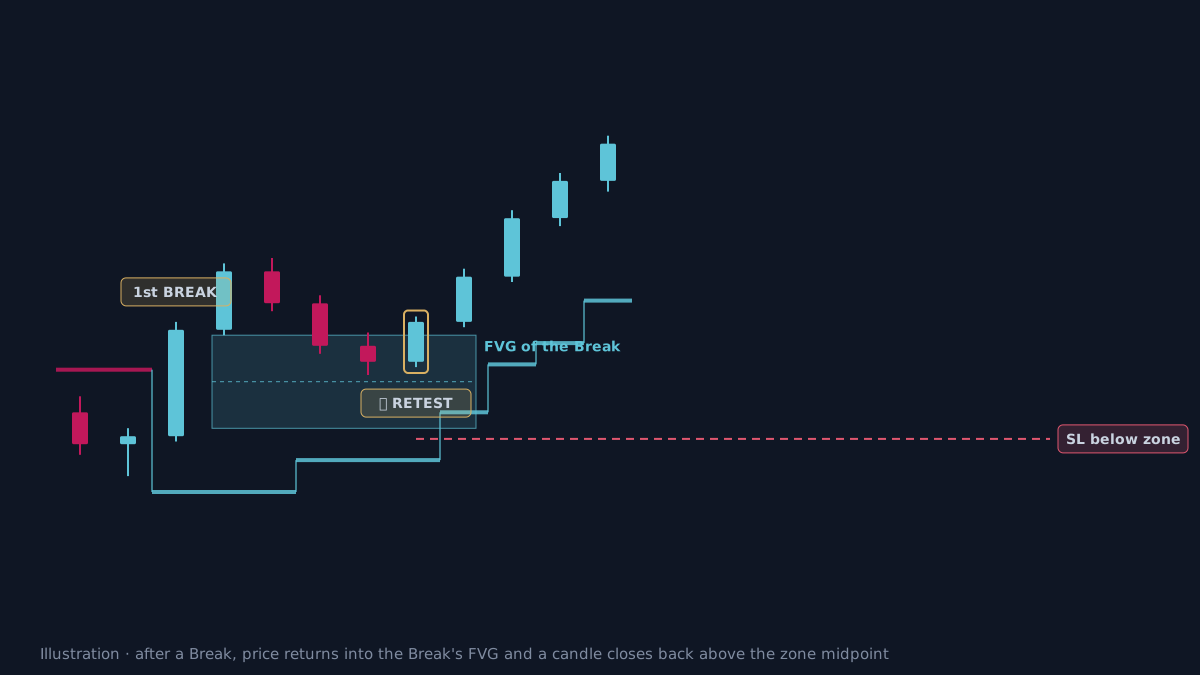 Illustration, not real market data. The dashed line inside the zone is its midpoint.
How does AURORA Pro identify SMC RETEST?
- Anchored on a structural Break: by default the 1st / 2nd BREAK (All Breaks is optional). This is a structural event; it does not require that Break trade to have passed every filter.
- Choosing the zone:
- At the Break, AURORA looks for an Order Block within the previous 10 bars (zone at least 0.1 ATR).
- If a same-direction FVG (0.2 ATR or more) forms within 5 bars after the Break, the FVG zone replaces the Order Block.
- Validity: a zone lives for at most 30 bars. It is cancelled when price closes through it, when it expires, or when the trend cycle flips. Expired zones turn grey.
- Confirmation: after price touches the zone, a with-trend candle closes beyond its midpoint. Label
🔁 SMC RETEST, with a Q score. - Structural stop: 0.1 ATR beyond the zone edge, at least 0.3 ATR from the entry. When wider than 4 ATR, the label carries
⚠SL. - Shared SMC conditions:
- Trend-cycle direction only.
- By default, price must be on the right side of the Trailing line.
- The Entry Filter Profile minimum score applies.
- If a BREAK or SUNNY lands on the same candle, that setup wins. Within SMC, the priority is SWEEP → RETEST → IFVG.
- Separate statistics in the
↳ 🔁 RETESTdashboard sub-row (Full layout).
Limits of SMC RETEST
- Misses straight runs. If price never pulls back into the zone, there is no trade.
- Deep zones mean wide stops. A large FVG gives a wide stop; resize accordingly.
- Repeated retests. A ranging market can touch the zone several times before breaking it.
- Validate it separately. Compare the RETEST row with SWEEP and IFVG across symbols, after costs, before trusting the setup. Historical results, before costs.
Practical checklist
- Look for a retest zone only after a Break in the main trend direction.
- Prefer the displacement's FVG; use the Order Block only when there is no FVG.
- Wait for price to touch the zone, then for a with-trend candle closing beyond the midpoint.
- Drop the setup if price closes through the zone, or the zone is too old.
- Place the stop beyond the zone and size the trade from that distance.
Video Explainer
The video for this article is in production. The full written lesson is already complete.
Video chapters
- Missed the Break?
- The displacement's zone: FVG and Order Block
- Confirmation and invalidation
- The rules in AURORA Pro
- Limits
Show transcript
You missed the Break. Chasing means a distant stop; staying out means missing the move. SMC RETEST waits for price to come back to the zone the displacement left behind.
That zone is usually an FVG, a price gap created because the move was so fast. When there is no FVG, the fallback is the Order Block, the last opposite candle before the displacement.
The setup confirms when price touches the zone and a with-trend candle closes beyond its midpoint. If price closes through the zone, or the zone is too old, the setup is cancelled.
AURORA Pro places the stop just beyond the zone, at least 0.3 ATR away, and uses this setup only in the main trend direction.
Product documentation
Educational and decision-support content, not investment advice. Chart examples are illustrative or historical and do not guarantee future results. Trading carries a risk of capital loss.