The question
If price breaks through the setup's zone the idea is already wrong, so why wait for a Trailing line further away to cut the loss?
After this lesson you will
- Tell structural stops apart from Trailing-line stops
- Know where AURORA Pro places the stop for each SMC setup
- Understand the Warn only / Filter policy and how to resize when the stop is wide
What is a structural stop?
A structural stop sits at the price where, if touched, the setup’s own structure has failed: beyond the FVG zone, beyond the Order Block, beyond the sweep’s extreme. A small buffer is added so noise does not tag it.
Compared with a Trailing-line stop:
| Trailing-line stop | Structural stop | |
|---|---|---|
| Used for | BREAK, SUNNY | SMC RETEST, SWEEP, IFVG |
| Placed at | The Trailing line value at the signal candle | Beyond the setup’s zone or extreme |
| Logic | Exit when the short-term trend flips | Exit when the setup’s structure fails |
Why do SMC setups need their own stop?
- The idea fails earlier. An SMC zone often sits closer to price than the Trailing line; waiting for the line means a bigger loss than necessary.
- A more accurate 1R. Only a stop that reflects the setup makes that setup’s R statistics meaningful.
- Sometimes it is wider. A deep sweep puts the extreme far away; then the structural stop is wider than the Trailing line, and sizing needs care.
Common misunderstandings
- Structural stops are always tight. No. Deep sweeps or large zones create wide stops.
- A wide stop means big risk. Money at risk depends on size. With correct position sizing, a wide stop still loses exactly 1R.
- Right at the zone edge is optimal. Without a buffer, a small wick easily tags the stop.
- ⚠SL means skip. The warning is for you to weigh, not a ban.
Chart example
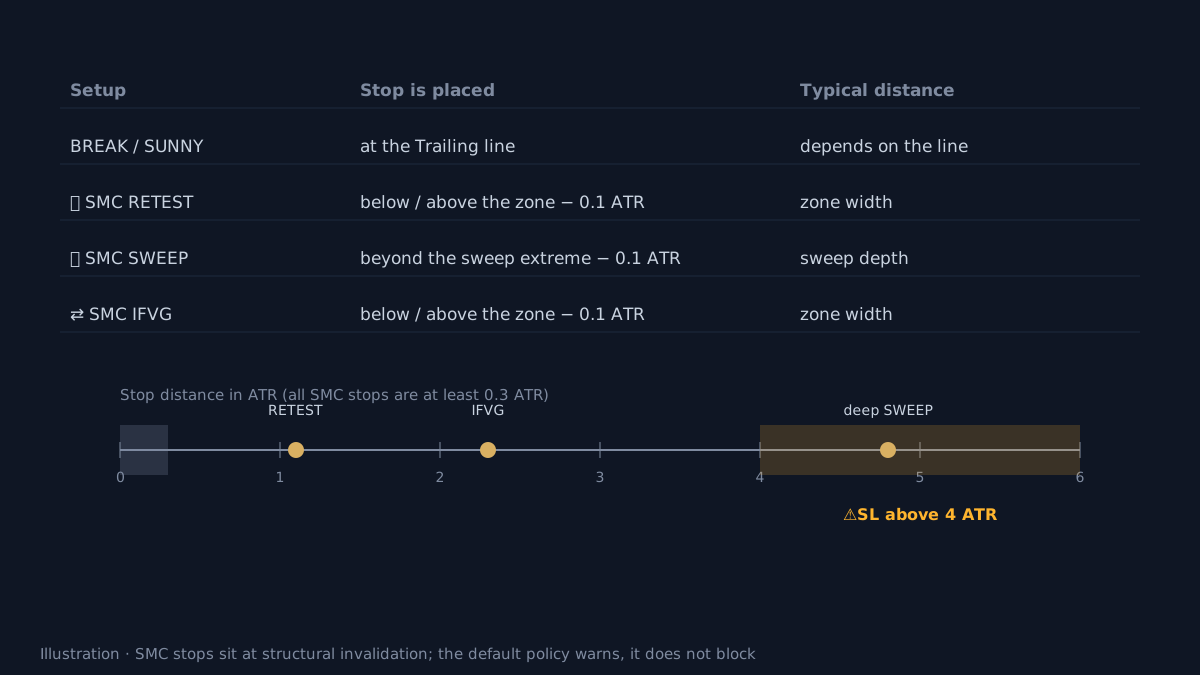 Illustration.
How does AURORA Pro handle structural stops?
- Placement:
- RETEST and IFVG: 0.1 ATR beyond the zone edge.
- SWEEP: 0.1 ATR beyond the sweep extreme.
- At least 0.3 ATR from the entry, so 1R is not tiny relative to costs and noise.
- Wide-stop policy (the SMC structural SL policy box):
- Off: width is not checked.
- Warn only (default): the trade is still taken and the label carries
⚠SL. The tooltip shows the width, for example⚠SL 4.8 ATR. - Filter: blocks setups whose stop is wider than the threshold. A
⛔ SMClabel shows the reason “structural SL > 4 ATR”.
- Default threshold 4 ATR, adjustable.
- Independent of the Entry Filter Profile: the profile’s stop limit applies to Break only; SMC uses this separate policy.
- The Strategy Validator tags wide-stop SMC trades with
W, for exampleSMC-SWEEP-L W, so you can compare wide-stop and normal-stop groups.
Limits
- Manual sizing errors. With ⚠SL, the correct size may fall below your broker’s minimum.
- Gaps jump any stop. In gapping markets the real loss can exceed 1R.
- 4 ATR is a starting point, not an optimum for every market. Compare the
Wgroup with the normal group before switching on Filter. Historical results, before costs.
Practical checklist
- Place the stop where, if touched, the setup's idea is clearly wrong.
- Add a small buffer beyond the zone so noise does not tag it.
- Size from the stop distance: a wider stop means a smaller position.
- When you see ⚠SL, consider smaller size or skipping rather than normal size.
- Switch to Filter only after comparing wide-stop and normal-stop groups in the Validator.
Video Explainer
The video for this article is in production. The full written lesson is already complete.
Video chapters
- The idea was already wrong
- Structure versus the Trailing line
- The stop for each SMC setup
- The ⚠SL warning and sizing
- Limits
Show transcript
For an SMC setup, if price closes through the setup's zone, the idea is already wrong. Waiting for a Trailing line further away means taking on unnecessary risk.
That is why SMC in AURORA Pro uses structural stops: beyond the zone edge for RETEST and IFVG, beyond the sweep extreme for SWEEP, plus a small buffer.
Structural stops are sometimes very wide, for example after a deep sweep. When wider than 4 ATR, the label shows a ⚠SL warning. By default AURORA only warns; it does not block.
The most important rule: a wider stop needs a smaller size, so the money at risk stays exactly as planned.
Product documentation
Educational and decision-support content, not investment advice. Chart examples are illustrative or historical and do not guarantee future results. Trading carries a risk of capital loss.